

How to Install Android O Preview on Pixel and Nexus Devices
The first Android N Developer Preview was released in March last twelvemonth and continuing with the trend, Google has released the very offset Android O Programmer Preview. Just like concluding year, Google has unexpectedly introduced the latest Android iteration but we aren't complaining. Everyone likes updates, even though it may be a long long fourth dimension before it's released to consumers. As the name suggests, the first preview of Android O (we don't know still if information technology's Oreo or not) is but available for developers. However, equally it'southward with everything Android, y'all tin install the Android O Developer Preview on your Pixel or Nexus device.
Notation : I'grand installing the Android O Developer Preview i on my Nexus 5X using a Windows laptop but the procedure should be like if not identical for other devices.
Some Things to Know
If you have enrolled your device in the Android Beta program, it'south important to note that beta updates are not supported in the Android O Programmer Preview. As well, the process requires yous to unlock the bootloader of your device, which will delete all user data.
Flashing the arrangement image volition also delete user data, and so I'll recommend you to backup your Android devices. Y'all can check out our detailed article on the different ways to backup an Android device. Also, since this is a very early developer build, yous can await a lot of bugs and issues.
Things You Will Need
-
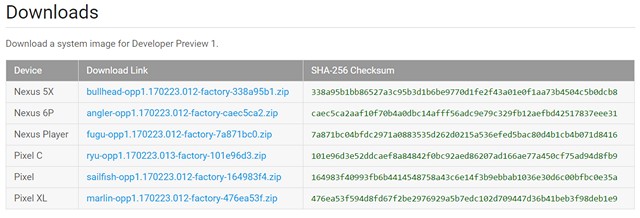
Android O System Image
Beginning, you lot will need to download the Android O Developer Preview system image for your device. You can download the images from the official Google website here. Android O Developer Preview is available for the Nexus 5X, Nexus 6P, Nexus Player, Pixel, Pixel Xl and Pixel C.
-
ADB and Fastboot
You lot volition need to have ADB and Fastboot tools on your Windows PC or Mac. You can download ADB and Fastboot here.
-
Android Developer Options
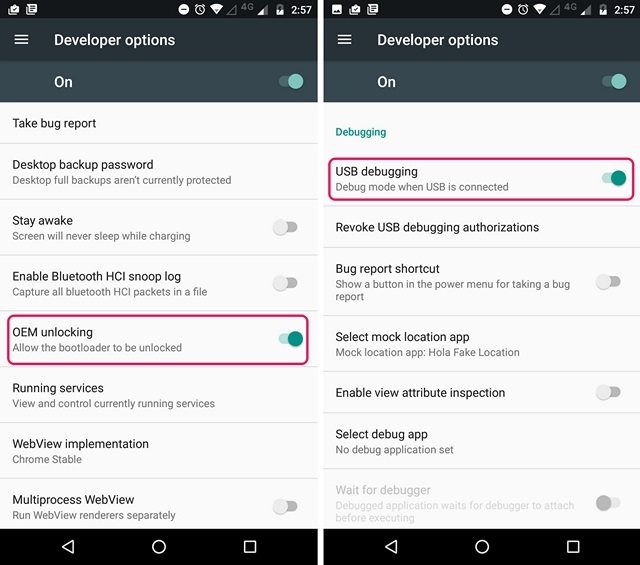
Earlier you get started with the procedure, yous will have to make sure that "OEM Unlocking" and "USB Debugging" are enabled in Settings->Programmer Options.
Unlock Your Device's Bootloader
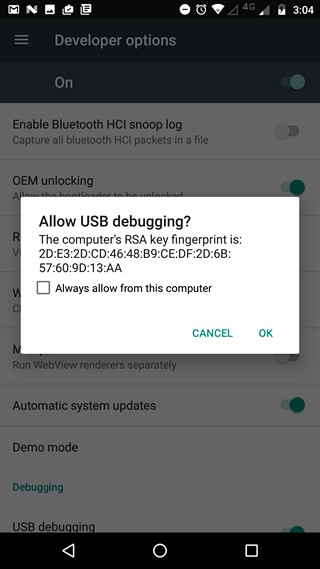
To flash the Android O system image, you volition need to first unlock your device's bootloader. To do this, first connect your Nexus or Pixel to your PC or Mac. And then, caput to the path where ADB and Fastboot are installed on your computer. Hither, open Command Prompt (printing hold Shift and right click to become the pick) or Terminal and enter the following commands:
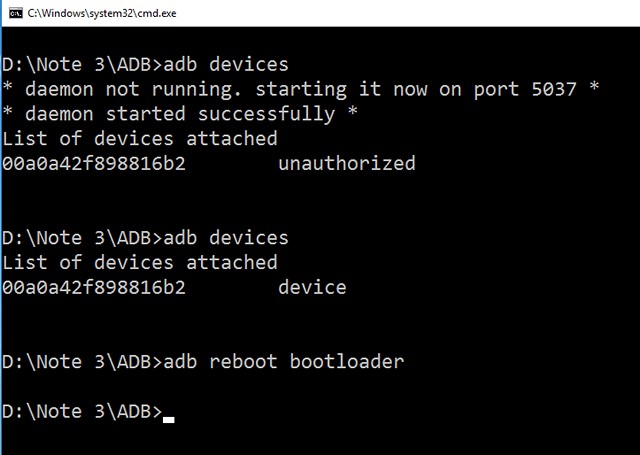
- To check if the device is connected or non:
adb devices
You will get a prompt on your device asking you to "Let USB Debugging". Tap on "Ok".
- Next, enter this command to reboot your device into bootloader fashion:
adb reboot bootloader
- One time your device starts upwards in bootloader fashion, enter this control to make sure fastboot recognizes your device:
adb fastboot devices
- And then, enter this command to unlock bootloader:
adb fastboot oem unlock
You lot should and then see a few prompts on your device. Accept it and after a while your device will be completely wiped and the bootloader will exist unlocked.
Note : If fastboot does not recognize your device, make sure your PC has the drivers for your device. You can manually install the USB drivers from here.
Flash the Android O Image
Now that you lot have unlocked the bootloader of your device, permit's flash Android O on your Nexus or Pixel:
- First, extract the Android O organization image you downloaded. Inside the extracted folder, yous volition find another ZIP file, excerpt that as well.
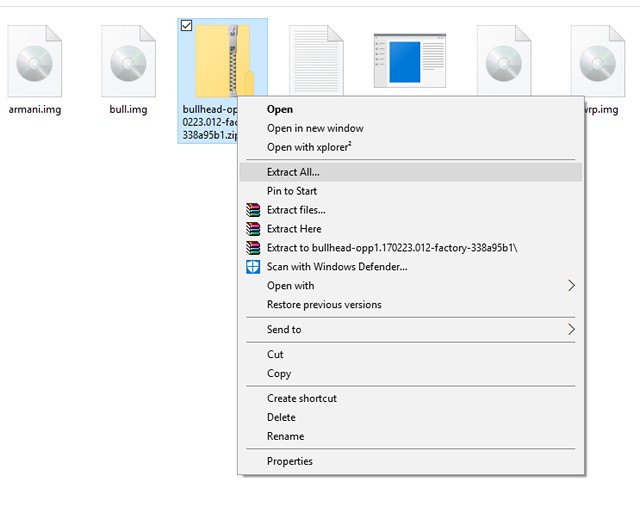
- Once you have extracted all the files, make sure to move them to the ADB and Fastboot binder.
- Then, make sure your Nexus or Pixel is in the bootloader style and launch the "flash-all.bat" file. This file should open upward Command Prompt, flash all the files and install Android O onto your device.
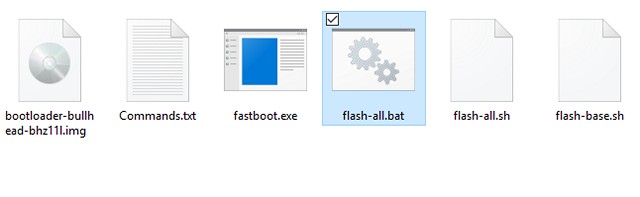
- Many people including me have run into errors when executing the batch file. Withal, there is an alternative way. Y'all tin can open up Command Prompt here and flash these images 1 by one via these commands:
fastboot flash kick kicking.img
fastboot flash recovery recovery.img
fastboot flash system system.img
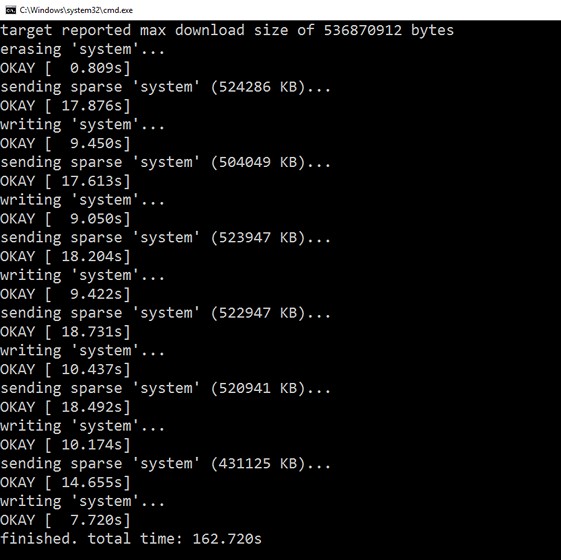
- Once the scripts terminate, your device volition exist rebooted and Android O should be installed on your device.
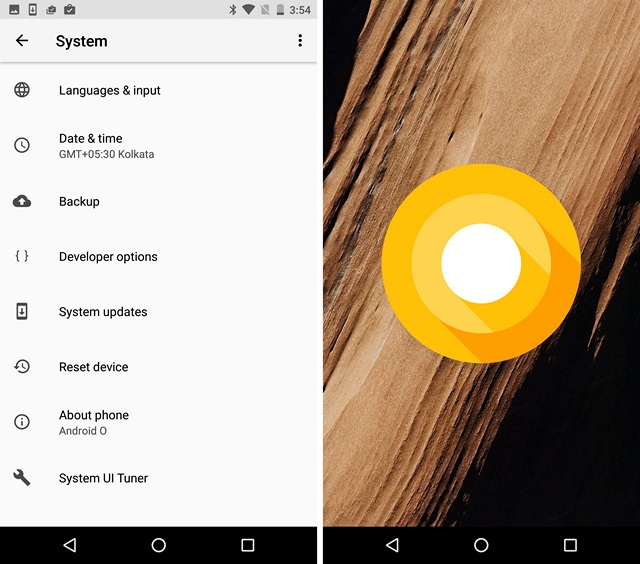
Yous tin now go to Settings->System->About Telephone and check the Android version (yeah, the Settings page has been revamped again). Android O brings a number of useful features, like a new picture-in-motion picture mode, improve notifications, improved battery life, UI changes and more.
Meet ALSO: viii Cool Android O Features You Should Know
Installed Android O on Your Nexus or Pixel?
Well, that's how you can install Android O on your Nexus or Pixel smartphone. As I mentioned above, the build is nevertheless in a very early development phase, so don't wink it on your primary device. So, accept y'all installed Android O nonetheless? If you have, do let us know how you like information technology, in the comments section below. Also,nosotros will be bringing a lot of articles on Android O features, Android O tricks, how it compares to Nougat, and more. So, stay tuned for that!

Source: https://beebom.com/how-install-android-o-nexus-pixel/
Posted by: perduewopmetuand.blogspot.com
0 Response to "How to Install Android O Preview on Pixel and Nexus Devices"
Post a Comment